Now you can manage your hosted applications using Cloud Storage Studio. For most of the tasks related to managing your hosted applications, you can now do them from your desktop without going to Windows Azure developer portal.
Here are the things that you could do with Cloud Storage Studio as far as managing hosted applications are concerned:
- You can manage one or more subscriptions and one or more hosted services in each of the subscriptions.
- You can create/update/delete/run your deployments.
- You can swap production and staging deployments.
- You can also promote a staging deployment (only when production deployment is not available).
- You can do both manual and automatic service upgrades.
- You can update the service configurations.
- You can manage SSL certificates associated with hosted services.
- You can view the affinity groups.
- You can view service properties.
Before you use this functionality, there are a few things that you would need to do on Windows Azure Portal:
- Create a hosted service using Azure portal (if not done already)
- Upload one or more X509 certificates and associate it with your subscription.
In order to use this feature, you would need to do one of the two things mentioned below:
- Either run this application as Administrator (Right click on application executable and then Run as Administrator)
- Or provide access to your windows user account to the certificate in your certificate store. For more information about how to do this, please read the following blog post: Error in reading certificates from certificate store
How to connect Hosted Service Using Cloud Storage Studio?
When you open Cloud Storage Studio for the first time it will show you Connect to Azure Storage window.
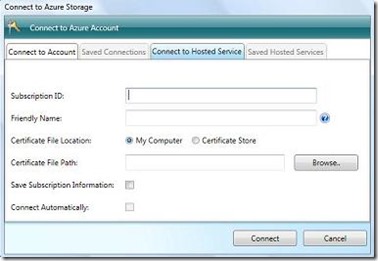
You can either connect to Storage Account or Hosted Service. To connect with Hosted Service select third tab “Connect to Hosted Service”.
When you select Connect to Hosted Service tab you will see following fields:
- Subscription ID: It is a Subscription Key. It is required field.
- Friendly Name: If you wish to identify a subscription by a friendlier name (i.e. a name that you can remember e.g. My Accounting App), please specify it in the Friendly name box. Please note that this is specific to Cloud Storage Studio only and will not store this information in Windows Azure.
It is not a mandatory field. If you leave this field empty, Cloud Storage Studio will take your Subscription ID as a friendly name.
- Certificate File Location: Before browse certificate, you have to select from where you want to browse the certificate: either from your computer by giving a path location or from certificate store location by giving a thumbprint. Please note that same certificate must be uploaded first in the Azure Services Portal.
- Certificate File Location: Here you have two options:
Select certificate from your computer: When you select “My Computer”, you can browse your certificate from your computer.
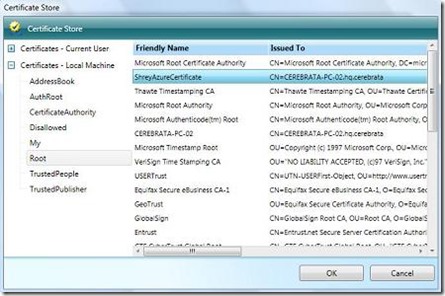
Select certificate from store: When you select “Certificate Store”, it will open Certificate Store window. In that window you get the list of all stores by locations. When you select particular store, it will show you all certificates related to that store in the left side of screen. You can select particular certificate and click on “OK”, it will show you Thumbprint of that certificate in the textbox.
- Save subscription Information: If you want to save this subscription then select the check box. Please note that this information will save by Cloud Storage Studio only on your computer (Temp folder) not on Windows Azure.
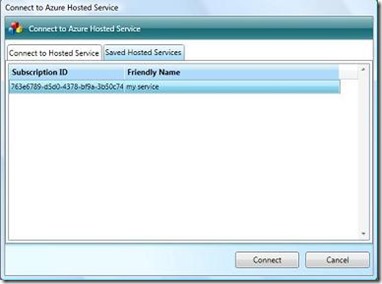
If you don’t select check box Cloud Storage Studio will not save this subscription information on your hard disk.When you save subscription information it will visible in fourth tab of Connect to Azure Storage window. You can direct connect with subscription by double clicking on them.
- Connect Automatically: If you want to connect subscription automatically when Cloud Storage Studio starts then you have to check this check box button. If you have saved subscriptions then you can direct connect to them by going on “Connect To” combo box on top of the screen. It will add you subscription in tree view.
Viewing Hosted Services Details
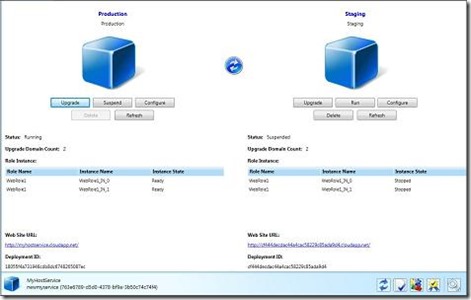
When you click on a hosted service from tree view, the hosted service details will appear in a tab on the right side of the window. One thing you will notice is that the user interface for viewing hosted services information is very much similar to what you see on Window Azure Portal.
If a particular deployment exists, then you’ll see following properties for a deployment:
- Status: Shows you current status of deployment whether it is Running, Suspend or Suspending etc.
- Upgrade Domain Count: It shows you a total upgrade domain count of deployment. This value is given by you in Service Definition at the time of building your application.
- Role Instance: It shows you all Role (Web Role and Worker Role) of your deployment with their Name and State.
- Web Site URL: It shows you a URL of you application. You can direct click on the link to launch the application in Explore.
- Deployment ID: It shows you ID of your deployment.
If a particular deployment does not exist, then you will have an option of creating that deployment. Just click on the “Create” button to create that deployment and follow the steps defined in Create Deployment section below.
Here is what you can do with a Hosted Service using Cloud Storage Studio
- View Hosted Service Properties
- View Affinity Group Details
- Manage SSL Certificates
- Refresh Hosted Service
- Manage Deployments
- Change Configuration Settings
- Swap Deployments
- Promote a Staging deployment to Production.
Following sections describes each one of them in more details.
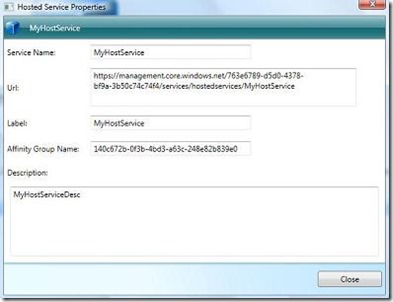
Viewing Hosted Service Properties
The Service Properties operation retrieves properties for the specified hosted service.
Here you will be able to view the following things:
- Name: The name of the hosted service.
- URL: The address of the hosted service.
- Label: The label of the hosted service.
- Affinity group name: The affinity group with which this hosted service is associated, if any.
- Description: The description for the hosted service.
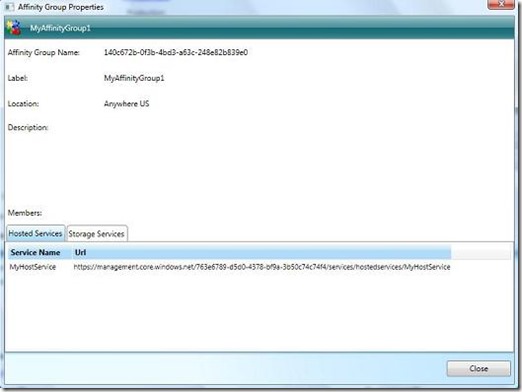
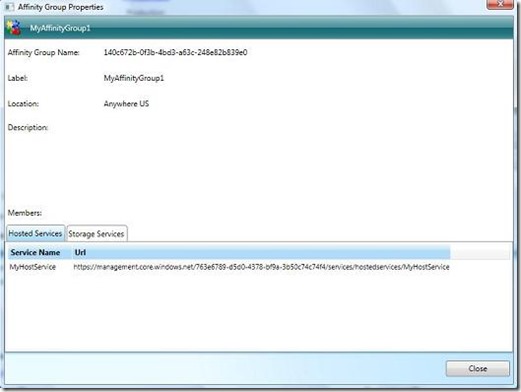
Viewing Affinity Group Properties
The Affinity Group Properties returns the properties associated with the specified affinity group in which your hosted service belongs.
Here you will be able to view the following things:
- Name: – This shows the affinity group’s name.
- Label: – This shows the affinity group’s Label.
- Location: – This shows the geo-location of the affinity group in Windows Azure.
- Description: – This shows the description of affinity group.
- Members: – This shows all the Services (Storage and Hosted) which are associated with this affinity group.
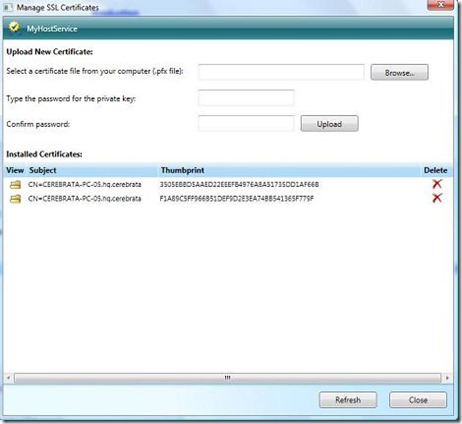
Manage SSL Certificates
This includes operations for managing SSL certificates for your Hosted Services.
You can do following operations through Manage SSL Certificates window:
- List Certificates: You will be able to view all certificates associated with the specified Hosted Service. You can refresh manually by clicking on Refresh Button for lists all certificates.
- Upload Certificate: You can add your SSL certificate with the specified Hosted Service using upload button. Click on Browse button and select a valid SSL certificate which you want to upload and then enter the password for specified file and click on upload button to upload specified certificate.
- Delete Certificate: You can delete a certificate which is associated with the specified Hosted Service by click on delete button.
- View Certificate: You can View a Certificate which is associated with the specified Hosted Service by click on View button.
Refresh Service:This operation will refresh the whole hosted service to get the current status of the hosted service.
Managing hosted service deployments using Cloud Storage Studio
Using Cloud Storage Studio you can perform following deployment related operations on your hosted services:
- Run
- Suspend
- Delete
- Configure
- Upgrade
- Refresh
- Create
Please note that these operations are similar for both production and deployment slots.
- Run: When you create the deployment it will always in suspended state. So to run the application online you need this feature to run the application online.
- Suspend: When your deployment is in Running State you can suspend it.
- Delete: It will delete the deployment. Before this operation can be performed, your hosted service must be in suspended state. If it is in running state then first of all you have to suspend it and then you can delete the deployment.
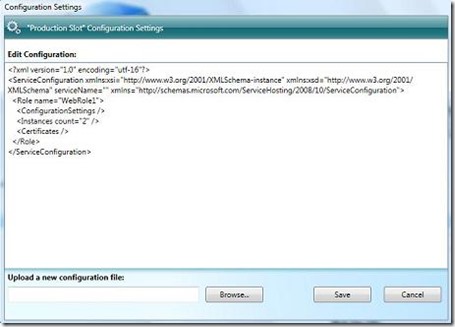
- Configure: You can change the configuration settings of the application from here. When you click on Configure button it will show you Configuration Settings window with the content of configuration file.
Either you can make changes in the configuration file content here or you can upload a new configuration file.
Note: Configuration file must be in proper XML format.
After clicking on save button it may take a few minutes to upgrade your deployment.
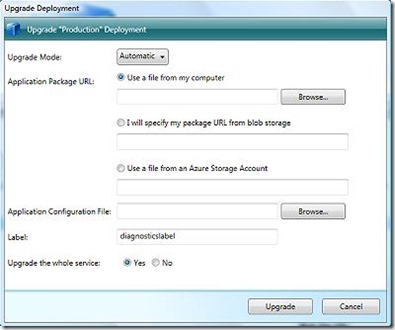
- Upgrade: Upgrading a deployment is the process of uploading a new version of your application. Using Cloud Storage Studio you can upgrade your deployment. Cloud Storage Studio supports both Automatic (all upgrade domains are upgraded automatically one after other without requiring user intervention) and Manual (User intervention is required to upgrade individual upgrade domains) upgrade mechanisms.
Upgrade Mode: You choose how you want to upgrade your service: Automatically or Manual. This is required field.
Application Package URL: You have to give URL of your package. It is required field. Here you have three options:
- If you want to use Application Package file which is stored in your computer then select first option and click on browse button for selecting a package file. Please note that specified Subscription ID must have a valid azure storage account. Here Cloud Storage Studio first creates a new container according to the deployment slot (either forStaging or Production) and uploads specified package file into that container. After completing theUpgrade or Create operation, Cloud Storage Studio deletes this container from azure storage account.
- If you know the Package URL then selects second option and specifies it on second text box. But it must be a valid URL. A package URL is the URL of your application package stored in Blob Storage. Please note that the Storage Account and the hosted service must be under same subscription.
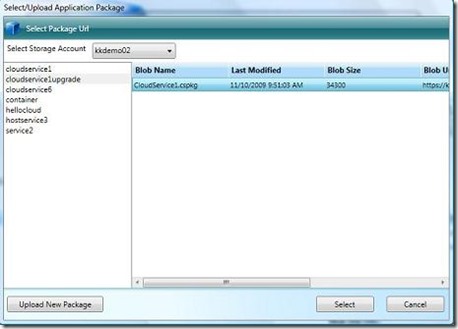
- If you don’t know the Package URL or you want to upload the package from your computer to any container then you have to choose third option. When you choose third option it shows you a Select/Upload application Package window.
If you want to select package from storage account then you have select account from the “Select Storage Account” Combo Box. After selecting account it will show you a list of all containers on left side of screen. From there you can select container, which show you a list of all blobs in it at right side of screen. From here you can select the Package file.
If you want to upload package from your computer into the selected containerthen click on Upload New Package button which is in bottom left side of screen.
Note: Before upload package you have to select the container from above list. It will upload you package in that container and return you URL of your package.
Application Configuration File: You have to select the configuration file. It is required field.
Label: It is a label of deployment. It is required field.
Upgrade the whole service: You have two options here:
- Either you can upgrade whole service or you can upgrade a particular Web Role.
- If you choose “Yes” it will upgrade whole service. If you choose “No” you have to select one Web Role, which you want to upgrade.
For Automatic Upgrades, all you have to do at this time is click on “Upgrade” button.
When you choose Manual Mode, you will see three buttons:
- Start
- When you click on start button it will start the upgrading of first domain. When upgrading of first domain completed, “Continue” button will visible on screen instead of Start button. Now you can continue your upgrading with others domains by using this buttons.
- Redeploy
- It will gives you an option while Manual upgrading to redeploy your application again. It will open same window and you can redeploy your application again from starting.
- Delete
- It will delete your deployment from your hosted service. First it will suspend the deployment then it will start deleting deployment (this process is happen without user’s intervention).
- Refresh:
- It will refresh you deployment and show you current status.
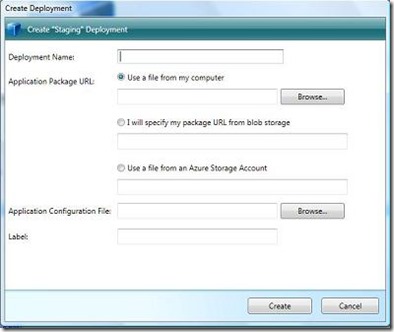
- Create Deployment
- When you click on create it will show you a Create Deployment window.
Necessary fields for creating:
Deployment Name: Name of the deployment. The deployment name must be unique among other deployments for the hosted service. It is required field.
Application Package URL, Application Configuration File and Label fields are same as Upgrade Deployment.
Swap Deployment
The Swap Deployment operation initiates a virtual IP swap between the staging and production deployment slots for a specified hosted service. Swapping operation can only be done if you have both the application deployed in both production and staging slots.
Promote Deployment:
Promote Deployment is like Swap Deployment operation however it only promotes the service which is in staging deployment to the production deployment. This button will be visible only if the service is available in staging slot and production slot is in create deployment mode. By clicking on promote button, staging slot service will be promote to production deployment and staging deployment will be on create mode.
View Affinity Groups
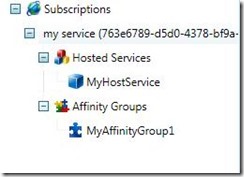
If you want to see all affinity groups related to your subscription then you can see from tree view by expanding the affinity Groups. It will show you all Affinity Groups to corresponding subscription.
When you click on particular Affinity Group, it will open Affinity Group Properties window.
Hosted service configuration settings
This window configures hosted service subscriptions and auto refresh interval.
You can perform following operations using this window:
- Insert subscription
- Edit subscription
- Delete subscription
- Auto refresh interval
Insert Subscription: You can insert subscription information for connect to hosted services. By click on insert button a new subscription window will open, here you need to give subscription information and click on save button. This information will be displayed on data grid if specified information would be correct.
Edit Subscription: You can edit saved subscription information by click on edit button for a particular saved subscription.
Delete Subscription: If you do not want to save particular subscription information in your preference file then you can delete particular subscription by click on delete button.
Auto refresh interval: Operations on hosted service (for example: – create deployment, upgrade deployment, swap deployment etc.) are asynchronous operations. To determine whether the management service has finished processing the last operation, the hosted service will be automatically refreshed in specified interval (seconds) to check the status of last operation performed on the service. You can set the auto refresh interval here.

